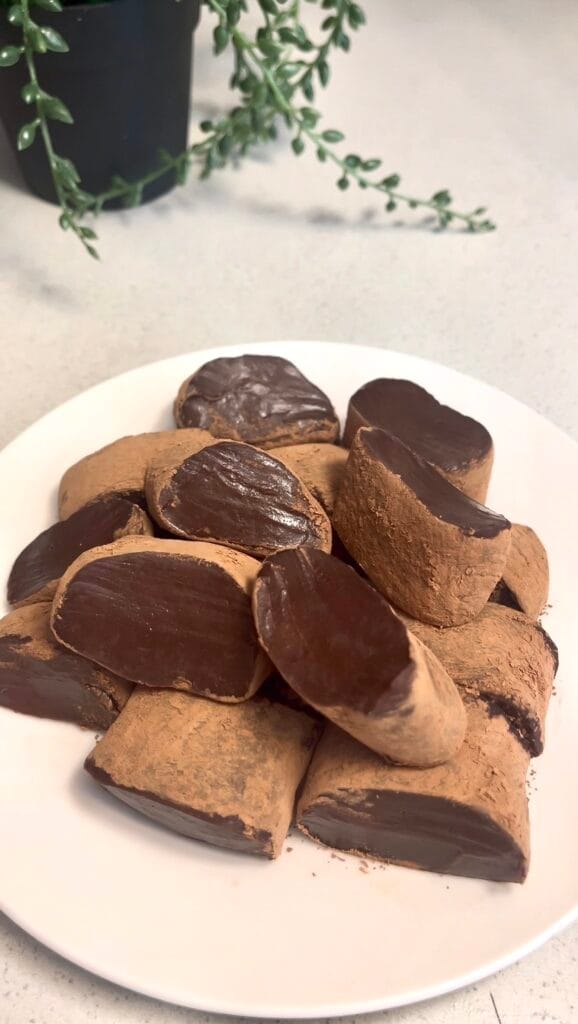
20 Mins Chocolate Mochi 🍫
If you’ve ever wandered through an Asian dessert shop, stopped in front of the mochi display, and thought to yourself “I could never make that at home”, this recipe is about to completely change your mind.
Mochi is one of those desserts that looks deceptively fancy and complicated, but is actually one of the easiest things you’ll ever make in your kitchen. And this chocolate version? It’s made entirely in the microwave, uses just 6 ingredients that you can grab from any supermarket or Asian grocery store, and is ready from start to finish in under 15 minutes. No steamer. No special equipment. No experience required. Just a bowl, a whisk, a microwave, and about 15 minutes of your time.
The result is these incredibly chewy, bouncy, fudgy little chocolate bites rolled in cocoa powder that taste like they came straight out of a fancy Japanese sweets shop. The outside has this gorgeous matte cocoa dusting, and when you bite into one, you get that signature mochi chew that is just so uniquely satisfying and completely unlike any other dessert texture in the world. And because we’ve added cocoa powder into the mochi dough itself, every single bite is deeply chocolatey all the way through. Not in a heavy, rich, overwhelming way. Just the right amount of chocolate flavour to make these completely irresistible.
Ingredients
- 100g glutinous rice flour
- 30g corn flour
- 40g sugar
- 15g cocoa powder (plus extra for dusting)
- 180ml full cream milk
- 15g unsalted butter
Instructions
1. Gather and prepare your ingredients
Before you start mixing anything, get everything measured out and ready to go. Weigh out your glutinous rice flour, corn flour, sugar, and cocoa powder and set them aside. Measure out your full cream milk. Cut your butter into a few small cubes rather than adding it in one big block. This helps it melt into the hot mochi more quickly and evenly later on.
This is also the time to set up your dusting station. Grab a small plate or shallow bowl and pour a generous amount of extra cocoa powder into it so it’s ready to go when you need it.

2. Mix the batter
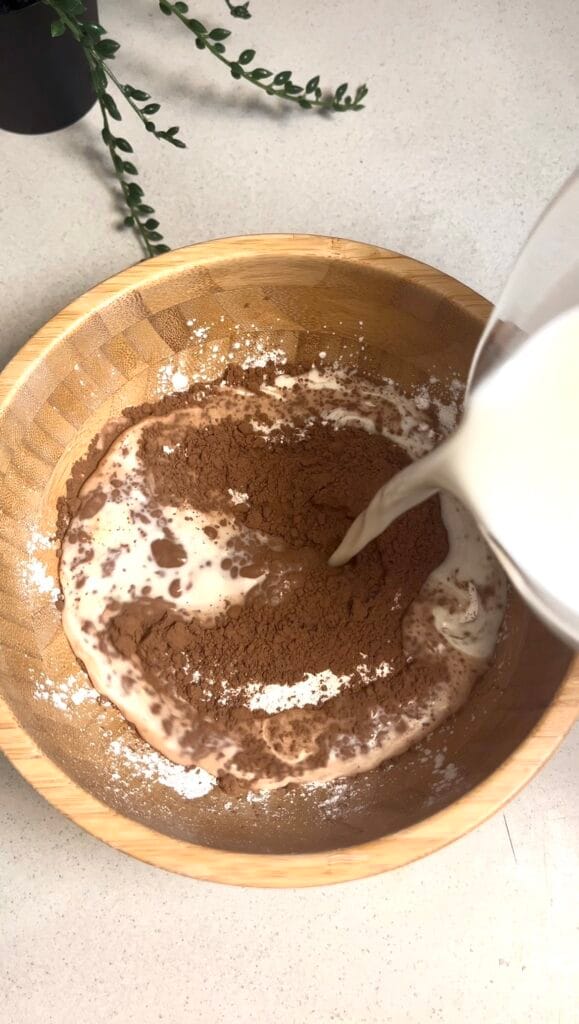
In a large microwave-safe bowl, add your glutinous rice flour, corn flour, sugar, and cocoa powder. Slowly pour in your full cream milk in a thin, steady stream while whisking continuously. The key word here is slowly. Don’t just tip all the milk in at once. Adding it gradually gives you much more control and helps the ingredients incorporate smoothly without lumps forming. Keep whisking the whole time, making sure to get right into the bottom and edges of the bowl where dry flour likes to hide.
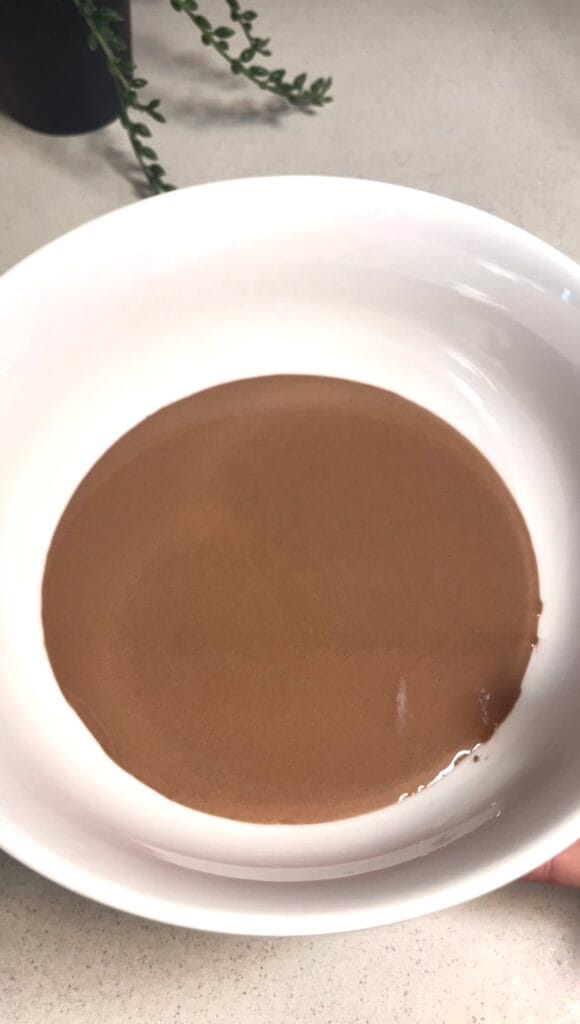
Keep going until the batter is completely smooth, glossy, and evenly coloured. It should look like a thin, silky chocolate milk with absolutely no lumps, streaks of dry flour, or patches of unmixed cocoa. Run a spatula along the bottom and sides of the bowl to check nothing is hiding.
And here’s a little trick. Once your batter is fully mixed, pour it through a fine mesh strainer into another bowl before microwaving. This catches any remaining lumps and guarantees a perfectly smooth, silky batter. Just use a spatula to press the batter through the strainer if it’s moving slowly, then give it a quick whisk in the new bowl and you’re good to go. It’s one extra step but it makes a noticeable difference to the final texture of your mochi.
3. Microwave the mochi
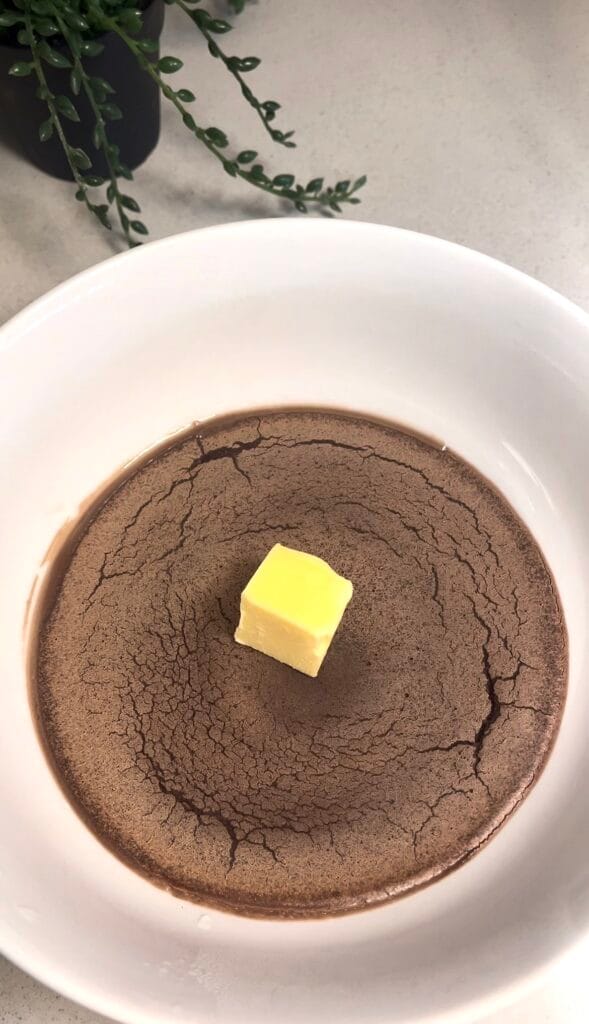
Microwave the batter on high for 3-4 minutes. When you take it out, the mixture will look completely transformed and honestly a little alarming. It’ll be thick, dense, sticky, and quite uneven on top. Almost like a gummy, overcooked chocolate cake that’s pulled away from the sides of the bowl. Some patches might look slightly darker or more set than others. This is completely normal and exactly what you want. Give it a thorough stir with your spatula and it will all come together.
❤️ Tip: Microwave wattages vary quite a bit. You’ll know it’s fully cooked when the mochi looks set all the way through with no wet, liquid-looking patches anywhere in the bowl. If you’re not sure, give it another 30 seconds.
4. Incorporate the butter
Working while the mochi is still piping hot, add your cubed butter directly into the bowl. The heat from the mochi will start melting the butter almost immediately. You’ll see it beginning to soften and pool around the edges of the mochi straight away.
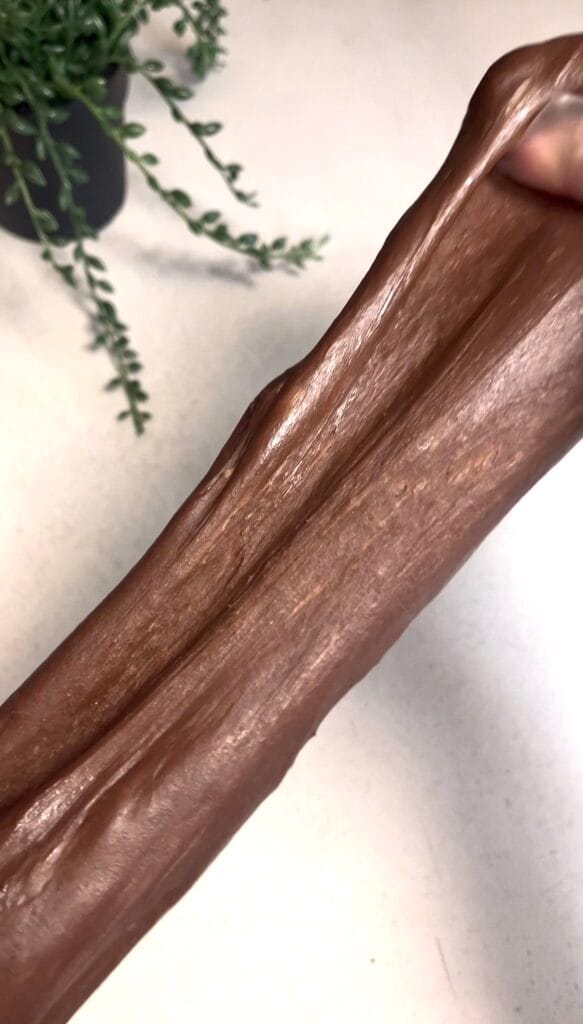
Using a silicone spatula or a sturdy wooden spoon, fold and stir the butter into the mochi with firm, continuous strokes. Press the mochi against the sides of the bowl, scoop it over itself, fold it, press it again. Keep going with real conviction. It will look messy and separated at first, like the butter is just sliding around on the outside rather than incorporating, but don’t give up. After about 1–2 minutes of persistent stirring and folding, the butter will be fully absorbed and the mochi will look noticeably smoother, shinier, and more elastic than before.
You’ll know the butter is fully incorporated when the mochi no longer looks greasy or separated anywhere and has a uniform, glossy appearance all over.
❤️ Tip: Don’t skip the butter or reduce the amount. It plays a really crucial role in the final texture. The fat in the butter coats the starch molecules in the glutinous rice flour and keeps the mochi soft and pliable for much longer. Mochi made without butter tends to harden considerably faster and becomes quite difficult to stretch and shape.
5. Cool the mochi until handleable
Let the mochi sit uncovered at room temperature until it’s cool enough to handle comfortably with your bare hands. It should feel warm but not hot enough to burn or sting when you touch it.
Don’t put the mochi in the fridge to speed up the cooling process. Cold mochi seizes up and becomes stiff and difficult to work with. You want it cool enough to touch but still warm enough to be soft and pliable. Room temperature cooling is definitely the way to go here. Just be patient.
6. Knead and stretch the mochi
Using both hands, grab the mochi and stretch it out as far as you can into a long rope shape. Really commit to the stretch, pull it as far as it’ll go without tearing. Then fold it back over itself into a rough ball shape. Stretch it out again, fold it back. Stretch, fold. Stretch, fold. Repeat this process 8–12 times, dusting your hands and the surface with cocoa powder whenever things start getting sticky.
As you keep going, you’ll notice the mochi gradually transforming. The surface will become smoother and more even. The colour will become more uniform. And most noticeably, the mochi will become increasingly elastic and stretchy. By the end, you should be able to pull it out to maybe 30–40cm without it tearing. That stretch and resistance is the sign that your mochi is perfectly kneaded, beautifully developed, and absolutely ready to shape.
❤️ Tip: Don’t rush this step and don’t give up if the mochi feels really stiff and resistant in the first few rounds of stretching. This is completely normal. It loosens up noticeably as you work it, and the more effort you put in here, the chewier and more satisfying the final result will be. If the mochi keeps tearing rather than stretching, it might just need another minute or two to cool down a little more.
7. Divide and roll into logs
Once your mochi is smooth, elastic, and stretchy, use a knife or bench scraper to divide it cleanly into 2 equal portions. Use a knife rather than tearing it apart with your hands. A clean cut gives you neater, more even portions to work with.
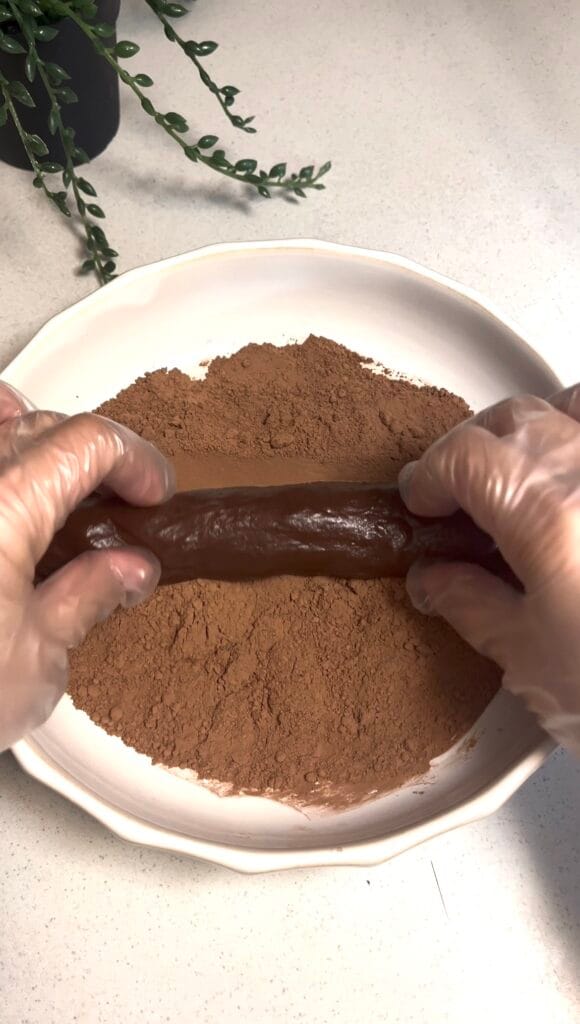
Take one portion and roll it between your palms into a smooth, even log shape, roughly 3–4cm in diameter and about 15–20cm long. Apply gentle, even pressure and try to roll it as uniformly as possible from one end to the other. Repeat with the second portion. If the mochi starts sticking as you roll, dust with a little cocoa powder.
8. Coat in cocoa powder and slice
Pour a generous, even layer of cocoa powder onto a flat plate or shallow tray. Place one mochi log into the cocoa and roll it back and forth, pressing lightly, until the entire outer surface is thoroughly and evenly coated. Repeat with the second log. Be generous with the cocoa. A thick, even coating looks beautiful and also prevents the pieces from sticking together once cut.
Using a sharp knife, slice each log into bite-sized pieces roughly 2–3cm thick. After each slice, you can also pick up the piece and toss it in the cocoa powder to coat the freshly cut faces as well. Wipe your knife blade clean with a damp cloth between slices for the neatest cuts.
Arrange your finished chocolate mochi pieces on a serving plate dusted with a little extra cocoa powder and serve straight away!
❤️ Tip: A sharp, straight-edged knife gives you much cleaner cuts than a serrated knife, which tends to drag and tear. Wiping the blade between cuts makes a surprisingly big difference to how neat your pieces look. It only takes a second and the results are worth it.
Extra Tips
1. Use the right flour
Glutinous rice flour is made from short-grain glutinous rice and is what creates mochi’s signature chewy, stretchy, elastic texture. Always read the label carefully before you buy.
2. Storage
Chocolate mochi is best eaten fresh on the day it’s made. The texture is at its absolute peak within the first few hours. Leftovers can be stored in an airtight container at room temperature for up to 1 day, or in the fridge for up to 3 days. If refrigerated, let them sit at room temperature for 15–20 minutes before eating as cold mochi firms up significantly. Do not freeze mochi. Freezing permanently damages the texture.
3. Dairy-free substitutions
Full-fat oat milk or full-fat coconut milk are the best dairy-free substitutes for full cream milk here. Soy milk also works reasonably well. Avoid watery, low-fat plant milks like rice milk or almond milk. For the butter, use a good quality vegan butter block.
4. Flavour and filling variations
Try rolling the finished logs in matcha powder, toasted desiccated coconut, or crushed freeze-dried strawberries instead of cocoa powder for a completely different flavour. For a filled version, flatten each mochi portion before shaping, place a small cube of dark chocolate or a teaspoon of peanut butter in the centre, wrap and seal the mochi around it, then roll into a log as normal. The filling gets slightly melty and gooey. Absolutely incredible.

20 Mins Chocolate Mochi
Ingredients
- 100 g glutinous rice flour
- 30 g corn flour
- 40 g sugar
- 15 g cocoa powder plus extra for dusting
- 180 ml full cream milk
- 15 g unsalted butter cubed
Instructions
- Prepare your ingredients: Measure out all ingredients. Cut 15g butter into small cubes. Set up a small plate with extra cocoa powder for dusting.
- Mix the batter: Whisk 100g glutinous rice flour, 30g corn flour, 40g sugar, and 15g cocoa powder together in a large microwave-safe bowl. Gradually pour in 180ml full cream milk while whisking until completely smooth and lump-free. Pour through a fine mesh strainer into another bowl, pressing through with a spatula, then give it a final whisk.
- Microwave: Microwave on HIGH for 3–4 minutes until fully set with no wet patches. Stir well with a spatula. It will look thick, dense, and uneven on top, which is completely normal.
- Add the butter: Immediately add 15g cubed butter to the hot mochi. Fold and stir firmly for 1–2 minutes until fully absorbed and the mochi looks smooth and glossy all over.
- Cool the mochi: Leave uncovered at room temperature until cool enough to handle comfortably. Do not refrigerate to speed this up.
- Knead and stretch: Stretch the mochi into a long rope then fold back into a ball. Repeat 8–12 times until smooth, elastic, and able to stretch 30–40cm without tearing.
- Roll into logs: Divide into 2 equal portions with a knife. Roll each into a log roughly 3–4cm in diameter and 15–20cm long.
- Coat and slice: Roll each log in a generous layer of cocoa powder until fully coated. Slice into 2–3cm pieces, wiping the knife between cuts. You can toss cut pieces in cocoa powder to coat all sides if preferred. Serve immediately.
Notes
- Use the right flour: Glutinous rice flour (糯米粉) is not the same as regular rice flour. They cannot be swapped. Always check the label.
- Storage: Best eaten fresh on the day. Store leftovers in an airtight container at room temperature for up to 1 day or in the fridge for up to 3 days. If refrigerated, bring back to room temperature for 15–20 minutes before eating. Do not freeze.
- Dairy-free substitutions: Swap full cream milk for full-fat oat milk or coconut milk. Use a vegan butter block.
- Flavour and filling variations: Roll in matcha powder, toasted desiccated coconut, or crushed freeze-dried strawberries instead of cocoa powder. For a filled version, wrap mochi around a small cube of dark chocolate or a teaspoon of peanut butter before rolling into a log.